Instagram

Wednesday, 28 May 2014

This Year's Vegetable Varieties - Part 1 In The Greenhouse

Obsessed with Seeds..


Long before I had a vegetable garden or greenhouse I was really interested in different vegetable varieties and used to peruse seed catalogues longingly in the same way my husband studied car brochures full of fancy cars we were never going to own. 
Even though we still don't have a fancy car, we do have a vegetable garden and greenhouse. This means I now study seed catalogues with a whole new degree of enthusiasm - a level of excitement usually reserved for a Prada catalogue.
Over the last few months I have had many DMCs (deep, meaningful conversations) with Tony - the real source of all the work, knowledge and skill relating to the garden mostly discussing what we are going to grow this year. 


The seeds came from : Franchi (Italy), Thompson & Morgan, Tomatofest (USA), Victoriana Nursery and Sarah Raven 


My Vegetable Varieties for 2014


The list is similar to last year with additions, adjustments and the odd thing such as butternut and pattypan squash we’ve decided not to bother with  - more of that later but for now here's what we're growing in the greenhouse this year.


In The Greenhouse:
The biggest change has been this year’s tomato choices. I discovered a brilliant US website called Tomatofest. They had a HUGE choice. I chose several varieties that are entirely new to me based on flavour (obviously) but also making sure I had different colours and sizes and some that were better for sauces.

Those marked with * came from the US supplier Tomatofest, The Costoluto Fiorentina came from Franchi seeds in Italy, Black Cherry from Victoriana Nursery and the remaining ones from Thompson and Morgan.


April. The tomato plants have just gone in to the beds or planters on the floor (which are  a new addition this year).


The Greenhouse today ( a month later). Despite the cold weather everything is doing well.


End of April, mixed tomato plants go into beds in the greenhouse.


Today, L to R: Black Russian, Black cherry, Caro Rich also in this bed (not seen) Tigerella and Costoluto Fiorentina


This Year's Tomato Varieties:

Aunt Ruby’s German Green - a green beefsteak tomato with apparently excellent flavour (we will see…)

Lime Green Salad - a medium sized, chartreuse coloured tomato
  
Sungold - an excellent, sweet, orange-yellow cherry tomato - we grew it last year. 

* Ildi - a yellow grape tomato - came as an extra with the other seeds I ordered, looks good though.
  
Caro Rich a medium sized, orange tomato with ten times more beta carotene in it than other tomatoes - very interesting


Caro Rich grown from seed  now transplanted into  in the vegetable garden. Those in the greenhouse  will crop earlier

  
Tigerella a delicious large red and orange/green  striped tomato. We grew this last year too.

Matt’s wild Cherry - Very small, red, cherry tomatoes. I’ve read mixed reviews of them but worth a try if for no other reason than my husband is called Matt!

* Spoon even smaller red tomatoes, the size of a pea. The novelty appealed to me, the website claims they're sweet and tart (but annoying to pick).


The tomatoes stay tiny - about the size of a pea. These are in the greenhouse but there are some outside too.


Costuluto Fiorentina the original, red, Italian beefsteak tomato. I'm trying this in place of last year’s slightly disappointing 'Brandywine'.

Black Russian we grew these last year - a warm chocolatey colour - pretty, with excellent flavour.

Black Cherry similar to Black Russian but cherry sized with very good flavour


Like last year we’ll squeeze what we can into the greenhouse (about 15 plants) and the rest have been planted outside this week. 


Also in the Greenhouse:

Cucumber:

Socrates’ a prolific,small cucumber sweet and delicious. Absolutely fantastic. Last year they were one of my favourite things that we grew.


End of April, The cucumber plants are in planters on the greenhouse bench, they'll be trained up wires 


A month later, I counted 18 cucumbers on this plant so far.
The first cucumber of the year, curiously way ahead of any of the others !


Chillies - not sure what sort ! We grew some from seeds we were given at Wahaca (the Mexican restaurant), plus a hot chilli mix


Herbs - Newly grown from seed in the greenhouse this year - Greek Basil, Chervil and Coriander. Everything else has overwintered ourside.

Chervil, one of my very favourite herbs.
A tray of Greek Basil. It  forms a ball and looks a bit like a Box hedge


Before being planted outside 


Courgettes

Squash

More Squash


Yet more Squash

Next time: The varieties we are growing in the vegetable garden.


0

Monday, 28 April 2014

Easter 2014


 Hello again. 

Spring is finally here, the daffodils are nearly over, the tulips are out and the flower bed in my vegetable garden is bursting with Spring flowers. 


Dicentra commonly known as Bleeding Heart, one of my favourite Spring flowers


After three and a half weeks of school holidays with a constant stream of friends and relatives visiting (26 in total), I’m finally able to blog again. 
I'm a bit foreign....

I’m Belgian (born in Brussels with a Belgian father and passport) but because I grew up in the UK, I think of it as my home and myself as English really. However there’s no doubt my motherland has had an influence, this is apparent in how we celebrate Easter so I thought I'd blog about my family's continental style celebrations.


Childhood Easters in Belgium.
A basket of eggs about to be hidden. 


When I was a child we quite often had Easter at my the farmhouse of my Walloon grandparents. 
They had 18 grandchildren and it wasn’t uncommon for us all to be there on Easter day.
Easter was a really big deal, at least as big as Christmas - possibly even more celebrated and la table de Paqûes (the Easter table), was one of the highlights of our year. This is because being a bunch of Belgians A LOT of chocolate was involved.
We’d go to church in our best clothes (this always seemed to involve a very itchy jumper) and when we got back there would be a massive egg hunt in the garden.

The Egg Hunt

At this point there was no chocolate, instead we would hunt hard boiled, dyed hen’s eggs. It was perfectly normal for my grandmother to dye and hide over 100 eggs. My cousins, siblings and I would run around wildly, lobbing eggs into our little baskets. At the end they'd all be gathered in and carried off to the breakfast table.


Hiding dyed hens' eggs not chocolate ones  is a tradition I have continued with my children.


Tulips Tony and I planted last Autumn ( see the Back to Black blog).


My Goddaughter Josephine and youngest daughter Dorothy looking for eggs among the tulips.


I had dyed 60 eggs  - they were in and around the vegetable garden.

Dorothy looking in some herb beds.


A quince tree just beyond the vegetable garden.


More eggs at the base of the Quince tree. We never find them all there are always a few left behind...


My teenage daughter Mary  joins in,  heading towards the Spring border.


The border in the vegetable garden where lots of eggs were hidden


La Table de Paqûes
  
This was always decorated and arranged in the utmost secrecy by the adults. 
The table always looked absolutely beautiful with flowers and pretty crockery and baskets of the collected coloured hen’s eggs.
At each child’s place there would be a relatively modest chocolate egg or bunny, but the rest of the table was covered in little clusters of chocolate eggs and dishes of Easter sweets were dotted about. It was a sight to make a child weep with joy and then send them into a sugar induced coma (if left unsupervised).


View of this year's  table laid for Easter breakfast.


A close up of the cut and decorated branches


Just like when I was a child everyone gets their own fairly modest egg or bunny too.


Traditions passed down

All these customs were faithfully copied throughout my childhood by my South African mother for the Easters when we weren’t in Belgium. 
I in turn have recreated them for my children for the last 19 years and I have no doubt my children, if or when they have children of their own will also recreate Bonne Maman's Easters. 


Just like Bonne Maman, I decorate the table with chocolates and sweets. 

The collected hardboiled hen's eggs


0

Monday, 17 March 2014

Hello Baby.


 My newborn nephew Stanley

Welcome to the world little baby


I LOVE babies. I am the person with mad hair (and eyes) who will play peek-a-boo with a stranger’s baby for hours on a train. 
My daughters at 20, 18 and 12 are a few years off having children (I hope) but I pity them when they do, as I’ll be elbowing them out of the way to get at their infant and no one else will get a look in. 
In the meantime I get very excited whenever anyone I know has a baby and I like to mark the occasion.
When my firstborn arrived (all 10lbs of her) I received the most delightful card from my friend Veronica saying:
‘Welcome to the world little Edith we hope you will be very happy’. 

I still have the card. It was so touching I’ve used that wording on every a baby card I’ve ever written.

For the baby:
I always send the same card. It’s very easy one to make and I think it’s lovely to get something handmade. 

You Will Need:

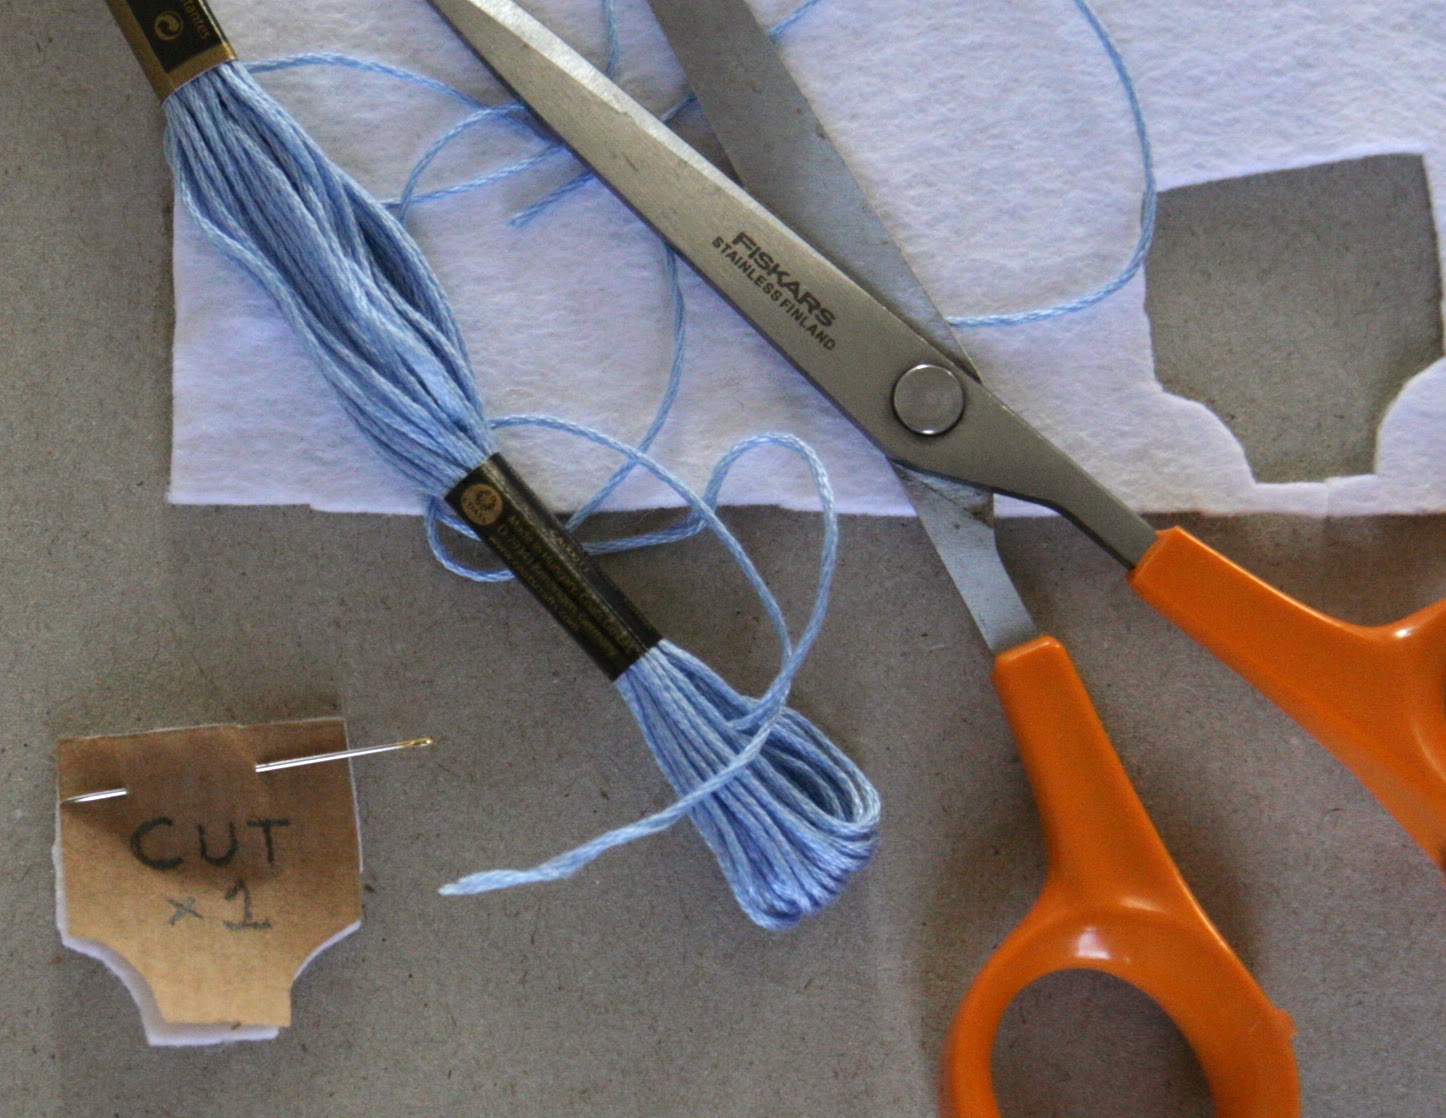
White felt or calico
Embroidery thread & needle
Thick cartridge paper 
Glue
Scissors
Pins


  Step 1: Make a paper pants pattern first, folding it in half to get it symmetrical.


Step 2: Cut them out of felt or calico (cut 2 for twins)

Step 3: Do running stitch leaving a big loop at the front which can
be snipped in the middle leaving 2 ends to be tied in a bow. 

Step 4: Tie the thread into a bow and glue onto the card. 


The finished card. 


For the siblings:

With Dorothy, my youngest, I was so enormous and immobile by the end of my pregnancy (she was 11lbs) I spent the last couple of days making many, many little cellophane cones of jelly babies which her older siblings took into school to hand out to their classmates when she was born. 
They were a big hit and looked so charming that since then I make the same cellophane cones to send to siblings of a new baby with a note congratulating them on becoming a big sister or brother. If you want to make the cellophane cone with jelly babies 
You Will Need:
For 1
1 x square of cellophane 35 x 35cm 
2/3 of a packet of jelly babies
45 cm of narrow ribbon 
Obviously you can make these any size, but this is as they're pictured.


* If you can get hold of it, florist's cellophane which comes in big rolls is fantastic and can be used for wrapping flowers, as an extra layer when gift wrapping and also covering books. 


For 5mm ribbon you need 45cm for 15mm ribbon - 50cm


Step 1: With the bottom corner of the cellophane square pointing towards you, roll the left corner towards right side corner and secure with 2 small pieces of clear tape. Aim for a long narrow cone.


Step 2: Fill 2/3 with the jelly babies and tie with ribbon et voila !
For the parents:

I rarely give baby clothes, over the years food has been the most gratefully received present.
If I can deliver it, I make a stew (always in a takeaway box so there’s no pressure to return dishes) or if it's by post I buy a big tin of chocolate biscuits. Chocolate biscuits are pretty much always a good idea but if a breastfeeding mother is involved she will probably want to bury her face in them and if she isn’t breast feeding, so hasn’t developed a dysfunctional relationship with sugar, she can hand them out to the stream of visitors.


Stanley's feet


0

Wednesday, 26 February 2014

Creating a Vegetable Garden from Scratch: Part 2


May 2012. The beginnings of cabbages..


Winter 2012

Two years after buying the house and after A LOT of planning we finally started work on the garden.


Trying to get it right first time.


The last hurdle before putting the finishing touches on the design, was to mark out the proposed dimensions of paths and beds using canes and spray chalk to check Glenn, Roger and I were happy with everything. 
After some tweaking, Glenn completed what we thought were the finalised plans and work began in November.

Failing to get it right first time  


However once the plot was properly cleared (by spraying what we didn't want to save, letting it die back and clearing with big diggers) Roger suggested adding an opening through the Crinkle Crankle wall. 
The idea was to have a wide path across the vegetable garden that led to a gate, through to the garden beyond.
Glenn had to redo the plans accordingly and all the beds had to be moved. Luckily as we hadn't got very far it was pretty straightforward.
It was a great decision and the archway through the wall to what later became a herb garden is one of my favourite things about the entire vegetable garden.


What had to go


The greenhouse (which I had been pretending was not a complete death trap for the past two years) finally had to come down. It was so rotten that from time to time panes of glass would just slip out of their disintegrating frames and smash. Going in there the previous summer to look after the tomatoes had been like an extreme, game show style challenge.
Next to the greenhouse was an equally rotten tool shed home to a giant (and I mean GIANT) hornets' nest. 
That was another extreme challenge situation - though I didn't know it at the time. When pest control came to get rid of the nest before we took the shed down they appeared in full protective gear with tanks on their backs like something out of Ghostbusters.
They were horrified when I admitted I'd been blithely going in there to get tools etc...
The potting shed also needed to partly go, as one side needed to be rebuilt and the rotten, leaky roof needed to be replaced. 
Finally the very sick espaliered fruit trees against the Crinkle Crankle wall were removed


 November 2012 The cleared plot with some beds already in position.

The beds before we repositioned them and added the path.

December 2012 The view from the kitchen, you can just see the transverse path 


The Crinkle Crankle wall before we added the opening.


The Crinkle Crankle wall with the opening, photographed from the other side


Spring 2013


By March, despite the VILE weather, all the beds were in position and the basic frame of the fruit cage had been constructed.
The potting shed had been rebuilt and re-roofed, we'd added a stable door and on the end wall a small window salvaged from the house. 
The foundations for the new greenhouse were done and the diseased fruit trees had been removed.
Because Suffolk is so dry we installed underground rainwater harvesting tanks from Halsted Rain.
We had also widened the flower border by the Crinkle Crankle wall and built the long beds where the avenue of espaliered fruit trees were going. These beds and the edge of the herbaceous border were constructed from Suffolk White bricks, this use of red and white bricks reflected the mix of bricks used on the main house. 

March 2013. The long beds In the foreground are for the avenue of 
espaliered Clapp's Favourite pear trees and Egremont Russet apple trees.

March 2013. The central 8 beds are narrower and taller than the outside beds. 
Here you can see the reconstructed potting shed. 

Early Summer 2013


The hedging arrived and was planted in trenches with rabbit proof fencing. Some plants went into the herbaceous border though the majority were planted in the Autumn.
The greenhouse was completed and the bed next to the cold frame was finished and planted out with herbs. 


May 2013.The new greenhouse put to immediate use 


The view towards the kitchen before the Breedon gravel went down. 


May 2013. The tree supports go in.


May 2013. Before the vegetable garden was finished it was already in use. 
The weather was so cold everything was at least a month late. 

May 2013. The hedging arrives, beech and box.

The box hedging for the perimeter of the espaliered fruit tree beds. 


The box going in round the frames that will support the fruit trees. 

The trench was dug to partly bury the chicken wire. 


The completed rabbit proof fencing. Eventually the beech will hide it. 


 End of June 2013 our first year growing our own vegetables. 

Autumn 2013

The gates finally arrived and the fruit cage was finished

November 2013 
November 2013 Salad from the garden

Next time; Creating a herb garden from scratch


0