Part 1:
Planning and Designing the Vegetable Garden
In the beginning
In October 2010 (after four years of looking) we found our house in Suffolk.
It was love at first sight not least because of the plot of land that came with it. The house stood at the end of a long drive, there was a copse to the left of the drive and behind the kitchen the perfect spot for the big vegetable garden I'd always dreamed of.
 |
Feb 2011.Before we started work. The potting shed was doorless and needed
re-roofing, the oil tank was too small, rusty and an eyesore
|
 |
October 2011. A view of the Crinkle Crankle wall. This peach tree was badly diseased
and was later removed to be replaced. The oil tank had been replaced and relocated.
|
The previous owner (a very sprightly octogenarian) had maintained the main garden but after the death of her husband two years previously had left what had been their vegetable garden untouched.
Starting the vegetable garden plan.
It was a very long process.
We waited more than a year before we started, this was partly due to lack of funds as we were renovating the house itself and partly because I wanted a year to see the garden in all seasons, see what came up and really think about how everything would work and where I wanted what, before we started.
 |
July 2012. Another view. We watched what came up over the course of a year and
lifted and saved what we could before clearing the plot.
|
 |
July 2012. The view from the derelict potting shed.
|
 |
The raspberry canes hadn't been weeded or pruned for 2 years but were still producing fruit !
|
Ideas
I had a big file of images, built up over the years of gardens I loved, torn from magazines or photocopied from books as my starting point. I also had lots of firmly held views about what I did and did not want. This is not always a good thing as I have a tendency to have very strong opinions about things I know little or indeed nothing about, so with not much practical know-how I needed to enlist the help of someone who actually knew what they were talking about.
The Garden Designer
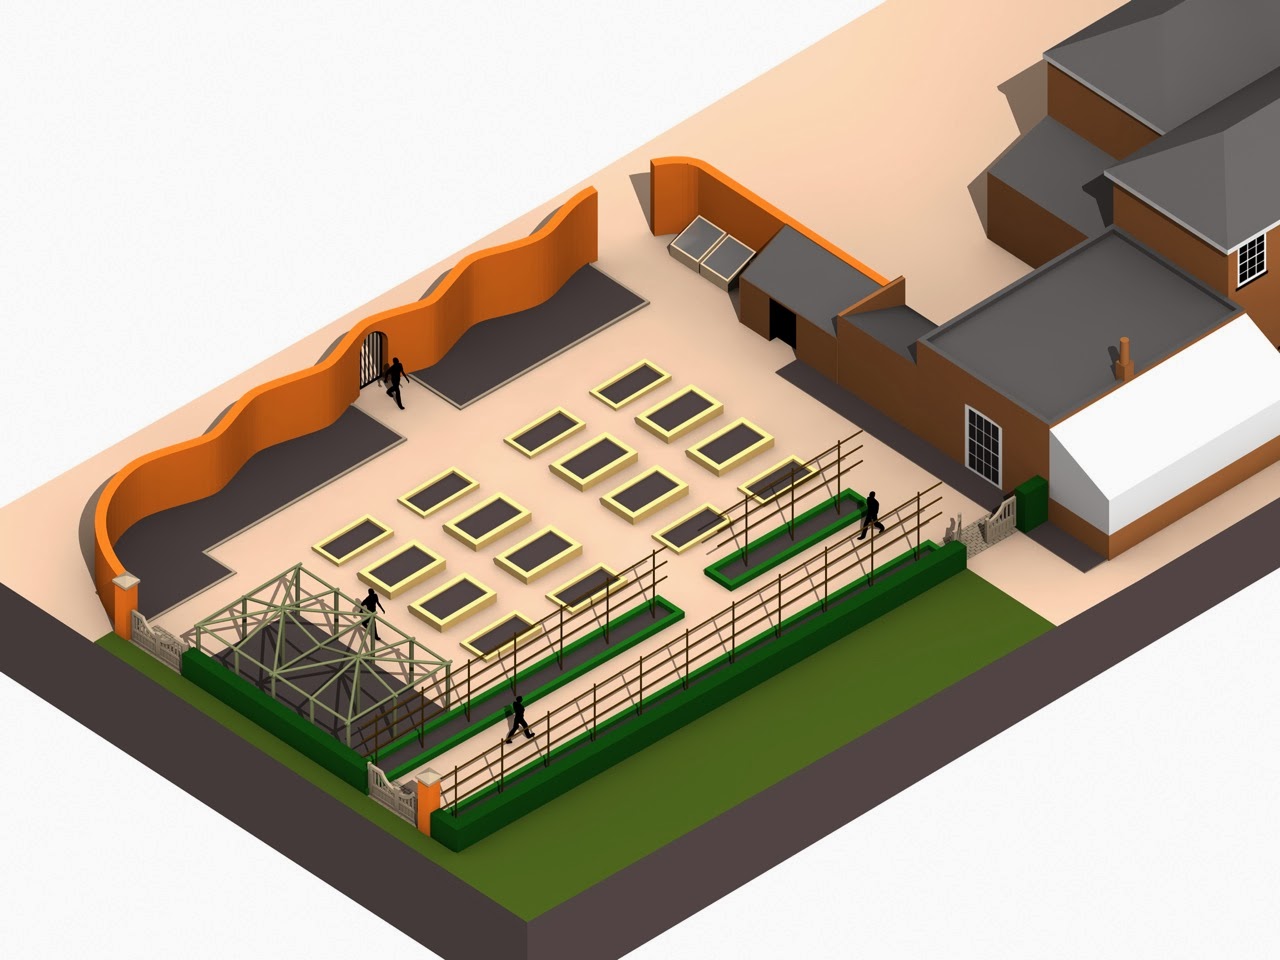
This is where the garden designer Glenn Swann came in. As Glenn was a friend I knew he would listen to what I wanted, wouldn't mind if I contributed design ideas myself but would guide me in terms of what was feasible. I knew he would diligently research what was appropriate for the location and period of the house and as the icing on the cake, as an ex graphic designer, I knew he was brilliant on a computer and could produce isometric drawings of what the garden would look like once it was completed - particularly helpful as while I find it quite easy to visualise interiors I find visualising gardens much harder.
I wanted to delineate the space more, it wasn't a walled garden but something where the boundaries were clearly defined would be great and finally we needed to protect the vegetables from the large and hungry rabbit/deer population.
Glenn came and took lots of photos and measurements, listened to me drone on for hours, took away my tear sheets and in consultation with the Landscaper - Roger Gladwell, this was what the final plan looked like.
 |
Glenn, Roger and I did a lot of marking out with canes on the original plot
to arrive at these measurements.
|
Enclosing the garden.
My original idea had been to have hoops with netting over them to protect each bed from being eaten by wildlife, but because we were going to delineate the vegetable garden with hedges the next logical step was to completely enclose the area to protect the vegetables by adding gates and rabbit proof fencing behind the hedges.
The plan was for the perimeter hedges hiding the rabbit proof fencing to be copper beech and the low hedges edging the beds containing the espaliered fruit trees to be box.
Copper beech and box contrast each other really well in terms of colour and texture. Although strictly speaking Beech is deciduous, as a hedge it doesn't really lose it's leaves until Spring when the new buds cause it to shed the now copper coloured leaves, so even in deep Winter it provides some screening and a lovely contrast to the evergreen box.
 |
| Above. The big,rustic fruit cage was inspired by pictures I'd seen of Bill Amberg's beautiful Somerset garden. The 8 central beds are more raised. |
 |
| Above. The new view from the kitchen window. The frames would provide support for espaliered apple trees (Egremont Russet) and pear trees (Clapp's Favourite) |
 |
Above. As the house is early Victorian, the gates were copied from an original Victorian
design. Here you can see the two brick piers mirroring each other clearly.
|
Next Time
Part 2: Building and Planting the Vegetable Garden
Glenn Swann Designer:
Roger Gladwell Landscape
http://www.rogergladwell.co.uk


No comments:
Post a Comment